I wanted to redraw some of my recent portraits just to see if I could reproduce their likeness, but in a different pose.
It's a fun exercise and really stretches you to refine your precious work! I have noticed though that some of my girls now appeared to have aged in their new sittings...maybe it's been a while in faery land!
Well.....I have this cute little book that hubby gave me.
It's supposed to encourage you to create a drawing a day. It didn't move me back in September when I received it but, on rediscovering it amongst my pile of 'must read next' books, I'm now keen to give it a try.
It is smallish, so gives my poor eyes a challenge, but I'm hoping to fill it with cute girls and cuddly animals.....here's hoping!
I love how, on this page, it looks as if the painter is actually putting the finishing touches on the girl's hair
You can group them together for a pretty display or you can scatter them around your home, tucked onto shelves, tables or any little space available.
Decorate them with patterns, words, snowflakes, simple pictures or whatever takes your fancy. These little works of art are precious little gifts that you can give by customising them for each recipient. You could even use them instead of name cards at your next dinner party!
The Pebeo High Viscosity Studio Acrylics are perfect to use as they will adhere well to the surface, have a wonderful range of colours along with the 'must have' fluoro and irridescent . Also you can apply them in a dimensional fashion for a really tactile feel to your rock or thin them a little with water for flatter line work.
Supplies
Pebeo High Viscosity Studio Acrylics in :-
Cerulean Blue
Titanium White
Dyna Irridescent Violet/Blue
Dyna Irridescent Green/Yellow
Dyna Irridescent Blue/Black
Fluorescent Pink
Fluorescent Orange
River rocks
Method
Wash and dry your rocks.
Glaze the background (or just a select area)The iridescent and fluro colours are quite translucent and can be used as a background glaze before any dots or line work are applied. I use my finger for glaze application on the rocks to eliminate the appearance of brush marks.
Either plan your design or let it evolve naturally.
Dots.Use a brush handle (or stylus) to apply the dots. Different sized handles will produce different sized dots.Dip the brush handle into the paint and press onto your surface. You can swirl your handle around on the surface to create a bigger dot if that is what you need. Each successive dot that you put down will become smaller unless you reload the paint onto the handle for each dot. The dots will remain raised when they are dry, so make sure you use fresh paint (just put a little out at a time), as when the paint starts to dry out, it will no longer make nice rounded dots.
For line work, particularly lettering, I thin the paint out slightly by brush mixing a little water into the paint right on my palette. This just gives me an easier flow in the stroke work.
You can obtain an attractive streaky look to a comma shaped brush stroke by loading your round brush in one colour (slightly thinned out as for line work), then picking up just a small amount of a second colour on the tip of your brush. Smoosh your brush fully down onto surface, tip to ferrule keeping your handle at the usual angle, then pull the brush towards you, lifting the brush until you come to the tip thus creating a ‘comma’ shaped stroke (You might want to practice this on paper first)
Experiment and try out different approaches to your rocks. If you make a mistake, you can simple wipe the paint off with a baby wipe or, for more precision, a cotton bud. (Try to remove while still wet as the dryer the paint, the harder it is to remove).
I'd reccommend finishing off your rocks with a coat of varnish.
I hope you have as much fun creating these adorable little rocks as I did
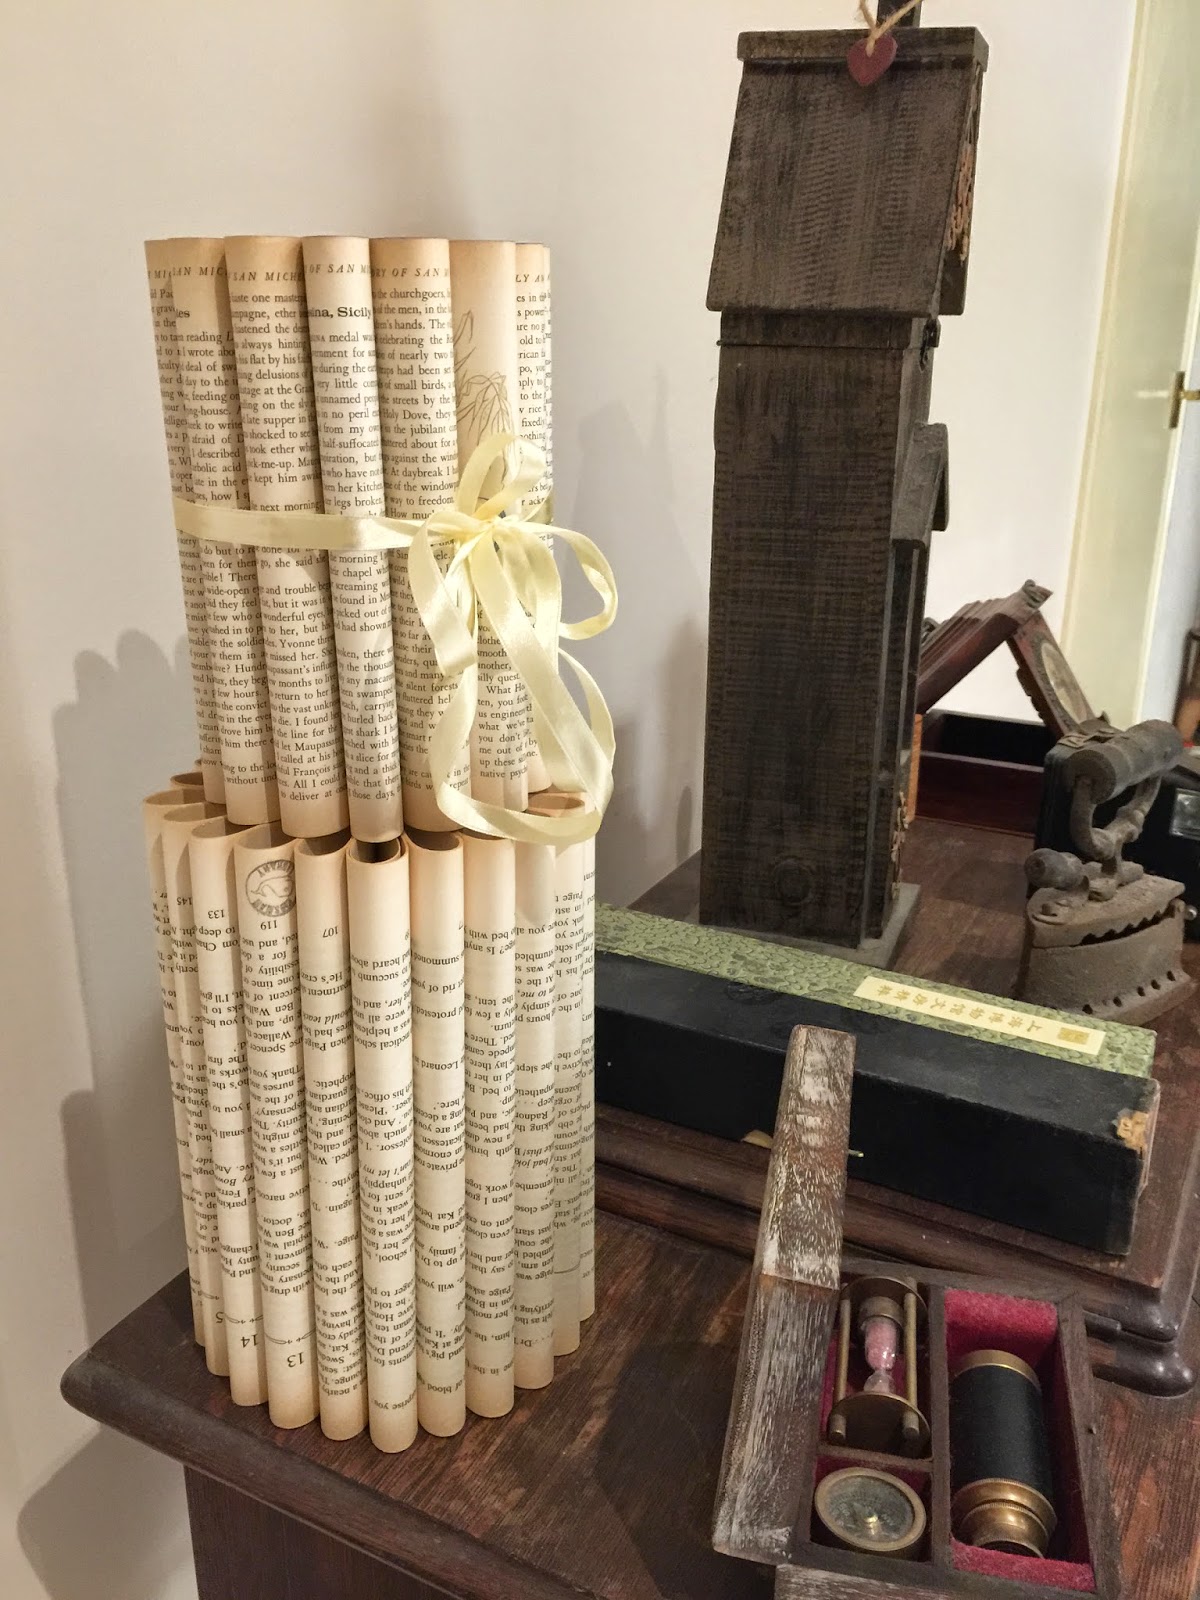
As if I don't have enough to keep me busy...I've discovered how cool folding book pages is! this one was so easy...I could almost do it with my eyes closed!
You want a book that numbered at 150 - 200 pages long which is an actual page count 75 to 100 pages
Separate your book from it's spine (ok...open your eyes as this step involves a sharp craft knife)
Insert a craft knife down where the page meets the spine between the very first page and the cover and then do the same at join of the very last page and the cover. Voila! your pages are now free from the cover.
You will be tucking in 5 pages at a time, so keep the page count to a multiple of 5
Start with your book laying flat on the table.This will allow you to hold the petals in place as you progress. .
Starting at the front, count out 4 pages and bend the pages around until the edge tucks into the center.
Continue on, but count out 5 pages each time
When you are about halfway,you will need to stand the book up and by now the 'petals' will stay by themselves
On the last batch of pages you will have 6. Leave out that last extra page and tuck it around the very first batch of 4 pages
The 'petals' should stay in by themselves, but you can tie a pretty piece of ribbon or some gorgeous lace around it for added stability.
Sit them side by side
Stack them on top of each other. Don't they look romantic on my antique sewing table
Lay them down on a shelf amid all your other treasures
Had an amazing find last week. In the 'back to school bin' I discovered 4"x4" large erasers (big eh?). Just perfect to use as stamp blocks, AND only $2 each! You can see here the preliminary drawings, the carved out stamp blocks and the final stamped image. Can't wait to do more!
I found this great little journal in the shop 'Typo' It's called the Graffiti Journal and each page contains some cool grungy backgrounds like crumbling walls or train doors.
The first pic comes from a recent stay my hubby had in hospital. The next spread is of a poppet that has found an abandoned train carriage to play on!


 Mother Earth hasn't aged of course!


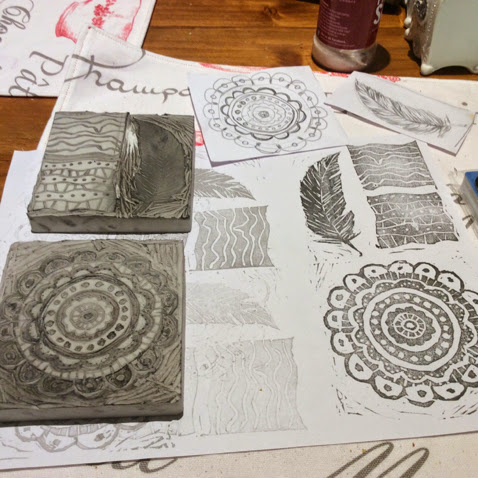 Had an amazing find last week. In the 'back to school bin' I discovered 4"x4" large erasers (big eh?). Just perfect to use as stamp blocks, AND only $2 each!
